The term “computer cleaning” itself is somewhat ironic. If you’re thinking that your computer needs cleaning, it definitely needs some adjustment or serious attention. Depending on whether it’s a desktop, laptop, or gaming PC, monthly cleaning will help your computer run faster, avoid overheating, and increase its longevity. This all-in-one guide will walk you through the whole process, from physical dusting to digital cleanup, so your PC is ready for use as it was at purchase.
Why Should We Clean Our Computers?
- Let’s get down to the basics: why computer cleaning plays such an important role in our lives.
- Prevent Overheating: Dust blocks airflow in fans and vents. As a result, your system may overheat, slow down, or even shut off unexpectedly.
- Improve Performance: The actual situation is somewhat paradoxical: the more untidy hard drives become, the slower the system performs. Therefore, that’s exactly where digital cleaning comes into action.
- Extend Hardware Life: The better a protocol is, the longer it lasts; consequently, it saves you money on repairs and replacements.
- Enhance User Experience: A clean screen, keyboard, and peripherals are not only hygienic but also easier to use and comfortable.
Clearly, and more importantly, included in the spectrum of the cleaning process is not simply aesthetic appeal; rather, it is essential for both performance and longevity.
computer cleaning: Outside & Inside
We will go with the cleaning of the physical parts of your PC.
Step 1: Power Off
Before you clean anything, make sure that the computer is turned off and unplugged. This is to prevent any electrical damage or accidental shocks.
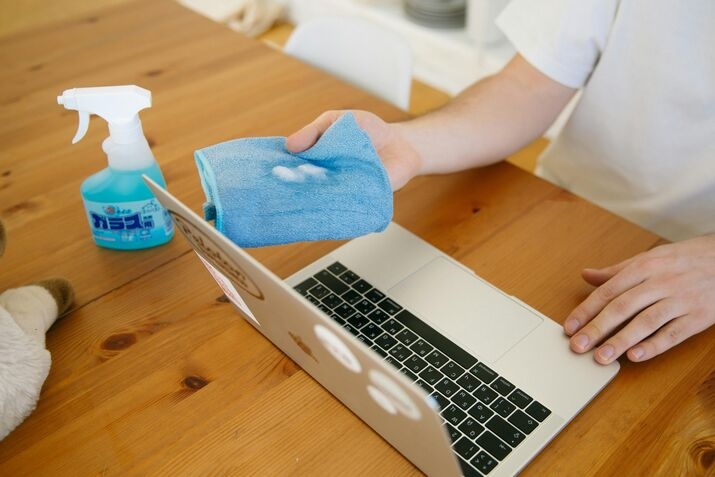
Step 2: Cleaning the Outside
- First, wipe the outer surface of your computer case, monitor, and peripherals using a dry microfiber cloth.
- For any smudges, simply dab the cloth with a bit of distilled water or an electronics-safe cleaner.
- Never spray directly onto the screen or device! Instead, spray onto the cloth.
Additionally, compressed air or a small soft brush works well for cleaning vents and ports.
. Also, these devices can help get rid of dirt in hard-to-reach places without doing any damage.
Step 3: Clean the Keyboard & Mouse
- Turn your keyboard upside down and shake it gently to dislodge crumb-sized debris.
- Use canned air between the keys.
- For the sticky parts, dampen a cotton swab with isopropyl alcohol, taking care not to overdo it.
- Similarly, wipe your mouse with a soft cloth, paying special emphasis on the buttons and optical sensor.
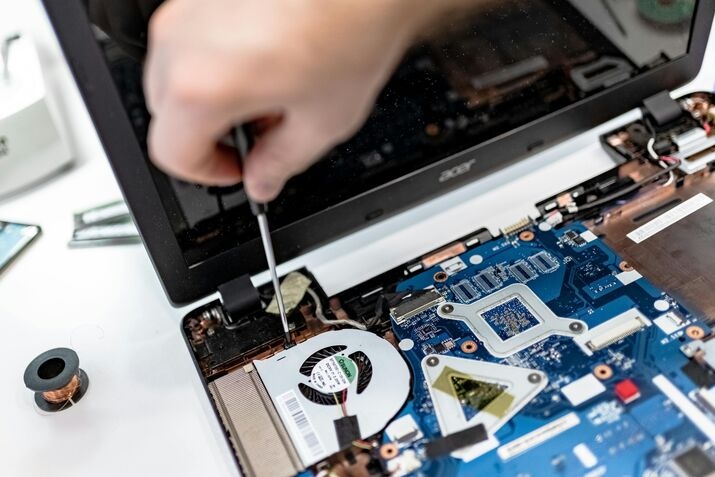
Step 4: Inside the Case Cleaning (Desktops Only)
Moreover, this step is crucial for desktops, which quickly accumulate dust.
- To begin, open the case with a screwdriver or use a latch if your PC is equipped with one.
- Take out any dust filters and clean them; a gentle rinse with water until completely dry will do.
- Use short bursts of compressed air to dislodge dust from fans, the power supply, and internal components. However, avoid allowing fans to spin from the force of the air-blaster—hold them still to prevent damage.
- If you feel confident enough, remove parts like the GPU or RAM to clean underneath. Just make sure you ground yourself beforehand to avoid static discharge.
- After cleaning, close the case, reconnect all cables, and power on the device to test.
Pro tip: For laptops, it’s best to stick to cleaning the vents and keyboard. However, internal cleaning is much trickier and often voids your warranty.
computer cleaning: Speed Up and Free Up Space
Hardware needs cleaning; software does, too. So, this is the part that improves speed and responsiveness.
Uninstall Unused Programs
To begin with, head to your Control Panel or Settings and remove apps that you truly no longer use. As a result, this frees up space and significantly reduces unnecessary background activity.
Clean Out Temporary Files
Remove them using built-in tools such as Disk Cleanup (Windows) or Storage Management (Mac):
- Temporary files
- Old system logs
- Caches
- Recycle bin contents
You will thus regain vital storage space and be able to respond faster.
Disable Startup Apps You Don’t Need
So many apps start themselves up, making the device slower to boot. To get rid of them:
- On Windows: Use Task Manager > Startup Tab
- On Mac: System Preferences > Users & Groups > Login Items
Therefore, disabling unwanted entries in here will greatly increase your device’s responsiveness.
Virus and Malware Scanning
Almost all budget antivirus programs provide at least basic malware protection; therefore, running scans regularly will allow you to identify any potential threats that may slow your system or place your data at risk.
Browser Cleanup
- To improve performance, clear the cache and cookies for faster web browsing.
- Moreover, take off any extensions or toolbars that remain unused.
- Alternatively, try considering lighter-weight browsers like Brave or Edge, especially for your older PCs.
How Often Should You Clean?
In addition, a routine maintenance schedule makes everything easier:
| Task | Frequency |
|---|---|
| Wipe screen, keyboard, mouse | Weekly |
| Clean vents and fans | Monthly |
| Deep internal dusting | Every 3–6 months |
| Digital cleanup | Every 2 months |
| Virus scan | Weekly |
| Backups | Weekly or Monthly |
By following this schedule, you’ll keep your system running like new without too much effort.
Recommended Cleaning Equipment (USA Buyers)
If you’re based in the U.S., then to get started, here are some good choices of cleaning tools readily available on Amazon and Best Buy:
- Compressed Air Canister – To blow out dust safely
- Isopropyl Alcohol (90%+) – To disinfect surfaces
- Microfiber Cloths – To clean screens and bodies
- Electronics Cleaning Kit – Swabs, brushes, and sprays included
- Mini USB Vacuum – Good for keyboards and those hard-to-reach crevices
Pro Tip: Instead of using household vacuum cleaners — which create static electricity that may damage your components — opt for safer alternatives like compressed air.
Mistakes to Avoid
Cleaning a computer is necessary, but doing it dangerously can become more harmful. Prevent these top 5 mistakes from happening:
- Spraying a component directly
- Putting too much moisture on electronics
- Using a vacuum (it can shock electricity into your components)
- Not powering it off or unplugging
- Letting fans spin freely while bombarding them with compressed air
- A few precautions will keep you from giving your computer lifetime damage.
Final Thoughts
Keeping your PC clean, physically as well as digitally, is one of the easiest things that streamlines its speed, keeps it from overheating, and extends its longevity. Though it might feel like a task, those few minutes spent each month will bring about huge benefits.
So whether it’s a machine of choice for casual uses or the battleground for hardcore matches, an immaculate feel will put that extra grace on your smoothness and enjoyment. Start today, and your PC will thank you tomorrow.
Pingback: Computer Cleaning – Site Title